Using Stripe with Mobile POS Reference Guide
Table of Contents
The Mobile POS app reduces the need for wait staff to return to a POS terminal for order placement and chit settlement. To facilitate the processing of a payment settlement with customers wishing to pay with credit card in a mobile environment, Stripe has been implemented with the Mobile POS app. With the pairing of Stripe readers, this allows for fast, reliable credit card transactions.
The first step in implementing Stripe with Mobile POS is creating an account with Stripe by using the onboarding link provided by your project coordinator. This is a one-time-use link that is valid for 7 days. If for any reason the link does not work, please contact your project coordinator. While creating this account, Stripe will ask for some business and Tax information, bank account information, and personal information, hence, it is advised that either the business owner or someone that can represent the business should be the one who signs up. By creating this account with Stripe, the club will be able to access their Stripe Dashboard to order readers. Please let your project coordinator know once you have created this account so that they can assist you with the next steps, which will be adding a location and ordering Stripe devices.
Please note you cannot order your readers until your Stripe account is set up.
Prior to attending training, please ensure to remove the readers from packaging and have them fully charged.
For information on setting up your M2 reader, please click
here
For information on setting up your BBPOS WisePad 3 reader, please click
here
1. The Mobile POS app will guide you through the payment process. Make sure your reader remains connected by leaving it powered on.
2. When the Mobile POS app is connected to a Stripe Reader on a workstation that is configured to accept Stripe payments, a credit card settlement option will appear on the settle chit screen.
3. Select “Credit Card”, a prompt will indicate to pass the device over to the customer to proceed. Click "OK" and hand the device over to the customer.
4. Customer will be given a pop-up which confirms the current charges and gratuities (if any) and the customer will be given the option to proceed or cancel at this point.
5. Customer selects “Proceed”.
6. Customer will be taken to a 'Add Gratuity' screen where they may select to add gratuity by % or flat rate (Note: this does not appear if gratuity is not enabled in POS back office).
7. Once gratuity has been selected and the customer selects 'Submit', they will be given another prompt advising them of the new total of the bill with the gratuity that was added (if any).
8. At this point they may proceed to make a payment by selecting proceed or cancel (Note: Selecting cancel will remove the gratuity that was added to the bill and it will need to be re-added when the customer goes through the checkout process again).
9. Once the customer has clicked proceed, they will be taken to the Stripe Processing page and the connected reader will be ready to accept payment.
10. The customer can use their card (or device, if using Apple Pay / Google Pay) and may insert, tap, swipe their card, or use their device on the connected card reader.
11. After collecting the card details, the app will process the transaction and will indicate if it was approved. This might take a few seconds. Customer will be given a popup to confirm that the transaction was completed and can choose to print a credit card receipt, chit receipt, both or none.
12. Once the customer has selected the preferred method of printing, the club staff can complete the transaction (which will take a moment) and close the chit from the Mobile POS system.
- Once you have successfully created your account and communicated with your project coordinator to add the required location, the Stripe Dashboard can be used to keep track of all Stripe transactions. All Stripe transactions can be exported into an excel sheet.
Viewing Transactions
- All the Stripe transactions can be viewed by navigating to Transactions > Payments. This will display all the transactions, including ones that were cancelled and refunded. The transactions can be filtered by Date / Amount / Status / Payment method by selecting the appropriate option(s).

Exporting Transactions
Stripe transactions can be exported into an Excel sheet by clicking on the export button. It is possible to select the date range and number of columns for the export, based on preferences. After selecting preferences, there is the option to either export it in Excel sheet or send it to the registered email address.


Individual Transaction Details
- Clicking on the transaction will display the details of a specific payment/transaction. This will open a screen similar to the image below.
- The example below shows what stage the specific payment is at, payment details, payment method, and fee.

- If you scroll down, then under “Events and logs” it will show how the payment was processed, that is, the stages it went through along with the corresponding date and time.

After the initial implementation or once the club has used the Stripe readers for a period of time, if additional readers are required, follow the step below to place an order through Stripe:
- Log-in to the Stripe account.
- Click on the “Payments > Terminal” and then click on "Shop" button under Hardware orders to order additional devices.

- Ensure that the correct Country for Delivery is selected, by clicking on the drop-down option besides “Deliver to” at the top of the screen.

- The available readers will be displayed on the screen. Please choose the same reader model as you currently have, to ensure that the reader(s) that you order are supported in your country. Optional accessories can be selected/purchased based on preferences.
- After selecting the reader(s) and accessories (if any), use the drop-down button to select the quantity of the readers/accessories. Next, click on the purple “Add to Cart” button.
- Click on the “Cart” button at the top right corner of your screen and click checkout. Next, add your payment method and place the order.

I can’t turn on the reader
Ensure the reader is charged. Check for physical damage to the reader and that the reader’s display shows as charging. If the reader still won’t turn on, reach out to Stripe.
I can’t connect the reader to the Mobile POS application
Confirm the reader is powered on (press the power button to restart your device), charged, and not connected to another device.
- Make sure your reader is sufficiently charged. If a reader software update is needed prior to connecting to your application, 50% battery life is required. If no reader software update is needed, 10% battery life is required.
- Ensure that the reader was fully disconnected from any previous device using the POS application directly, rather than taking the reader out of range.
- Ensure that the reader was not previously paired to a POS device via the device’s Bluetooth settings. Go to the Bluetooth settings in any previously paired devices and select “Forget device”.
- Confirm the reader is in-range of the POS device (usually 10-20 ft).
Troubleshoot the reader / iOS device’s Bluetooth connection:
- If the reader is in a holster or case, attempt to connect to the reader without the holster or case.
- Attempt to connect to the reader with the POS device’s WiFi settings turned off. It’s possible that the WiFi is interfering with the ability to connect to the reader via Bluetooth. If the connection succeeds with WiFi turned off, take one of the following approaches to resolve:
- Reconnect the iOS device to the internet using a cellular connection.
- Move closer to the WiFi access point to reduce WiFi interference.
- Reset the WiFi router to a 5GHz band to ensure 2.4GHz band (shared by Bluetooth) isn’t too crowded.
- Check that the version of your operating system is supported. The Mobile POS app currently supports a device with a minimum Android version of 7.0 which is also compatible with the Stripe Terminal Android SDK.
The reader lost connection with the POS device when it was turned off:
- Press the power button to turn on the reader again and reconnect with your smartphone or tablet.
- The reader may be at a lower battery level, please use the USB cable to recharge it, and try connecting it again.
- Ensure the device or smartphone/tablet is within the reception range.
I need to reset the reader as it’s showing no response
Press the reset button (using a paperclip or similar instrument) on the right side of the charging port.
I have tried the steps above and the reader is still not working
Check on the following:
- Make sure the reader’s software is up-to-date.
- Ensure Location Services are turned on for the POS device - GPS location coordinates are required for payments to succeed.
- Ensure Bluetooth is turned off in the POS device’s settings, because we don't want the reader to be connected to the POS device, instead we want them to be connected/paired with the Mobile POS App.
- Always connect to the reader directly from the POS application. Do not connect it via the POS device’s Bluetooth settings menu. If using M2 reader - upon connecting, the status LEDs on top of the reader will flash 4 times.
- Always disconnect the reader directly from within the POS application before connecting it to another POS device.
- Keep your readers charged. Readers should last for ~10 hours of standby use.
Device turned off automatically
- The display may turn off after entering the “SLEEP MODE” to save power. Please press and hold the power on/off button to restart it.
- If the above doesn’t work then it is possible that the device battery may have discharged, please use the USB cable to recharge it and then retry.
Device lost the connection with your smartphone or tablet when the device is auto-off
- Press the power on button to turn on the device again. The device will automatically connect with your smartphone or tablet again.
- The device may be at lower battery level, please use the USB cable to recharge it, then retry.
- Ensure the device or smartphone/tablet is within the reception range.
Device can't read your card successfully
- Please check to see if your reader has power and make sure that it is connected to your phone/tablet.
- Please make sure that there is no obstacle in the card slots.
- Please make sure that the chip of the card is facing the right direction when inserting card.
- Please ensure your phone/tablet is a supported model for this device’s operation.
- Please insert card with a more constant speed.
The payment was declined, what do I do?
The Swipe/Insert/Tap Card processing screen will provide the customer a decline response message for one or more of the following reasons:
- General decline – “Your card was declined.”
- Card Expired decline – “Your card has expired”
- Incorrect PIN – “Your card number is incorrect.”
- Insufficient funds decline – “Your card has insufficient funds.”
- Incorrect CVC – “Your card’s security code is incorrect.”
Based on the decline response it is recommended to request the customer that they can try again or ask for another credit card for retrying the payment process or alternatively take different payment method accepted by the merchant. (e.g., cash, member charge).
To retry processing the same
Select the “Cancel” button on the screen to return to the Payment Confirmation screen.
.png.aspx)
Select the “Proceed” button to restart the credit card payment process using the other card provided by the customer.
.png.aspx)
How do I refund a transaction?
- To refund a transaction processed via Stripe Credit card check out, you will first need to go to the back office system in Jonas Club Management/Encore and reopen the chit you wish to refund (Note: You are not able to refund Stripe payments from the back office and they must be reopened to be refunded via the app.)
- Once the chit has been opened the user will need to navigate to the chit in question on the Mobile POS App, where they will need to click on the settle option.
- Once on the settle screen, the user will need to click on the 3 dots beside the credit card line of the chit summary on the left side of the screen and select “Void Item”.
- User will be prompted advising that they will be refunding the entire payment including gratuity. Clicking “No” will cancel the process, whereas clicking “Yes” will start the refund.
- Once complete, the Credit card line on the chit will be removed and the user can make changes to the chit and recheck out when they are ready.
Device has no response
- Please use a paper clip to press the reset button near USB-C connector for reboot.
The reader can't read the card/ payment method successfully
- For contactless payments, please ensure the card or mobile device is placed within 1.5 in/4 cm of the contactless tap logo.
- For swipe payments and EMV card payments, please ensure the card is oriented correctly as shown in the image below.
- For swipe payments, please note that on EMV cards that support chip and contactless, magswipe is intended to be a fallback only for use after a chip or contactless attempt fails. Swipe on EMV cards will be declined unless it is a fallback use case. If a fallback swipe payment does not read, try swiping a little faster.
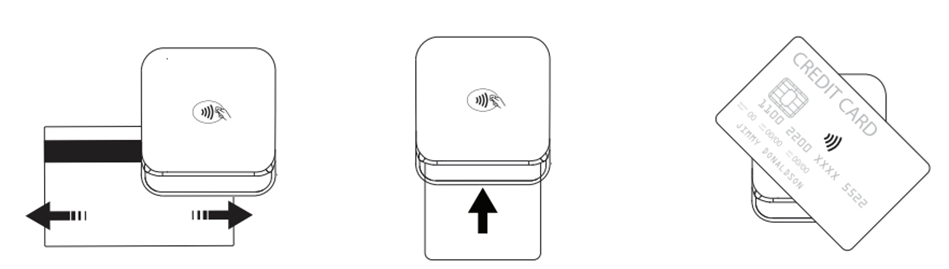
- Tips for inserting or swiping a card:
- Check if Mobile POS App instructs to swipe, insert or tap the card.
- Ensure that there is no obstacle in the card slots.
- Check if the magstripe or EMV chip is facing the correct direction when swiping or inserting the card.
- Ensure that your phone/tablet is a supported model.
- Swipe or insert the card at a steady speed.
- For contactless cards:
- Check that the card supports NFC payment.
- Ensure the card is placed within 1.5 in/4 cm range on top of the NFC marking.
- Take the card out of any enclosures, such as a wallet or purse, to avoid any interference.
Device can't be paired
- Press the power ON button to restart your device.
- Check if you can find the device’s “Serial Number” (Shown on the back of the device) in the “Scanned Device List” of your smartphone or tablet.
Device tampered
- A tampered device will trigger the self-protection mechanism by removing security keys data from the device and the device will stop operating.
- The first and fourth LED on the front side will be flashing rapidly.
- Contact Stripe support for more information
Device integrity check failed
- Device self-check failure
- The first and fourth LED on the front side turn on.
- Use a paper clip to press the reset button at the bottom for reboot.
- If it does not work after pressing the rest button then please contact Stripe support for further assistance.
The reader can't read the card/ payment method successfully
- For contactless payments, please ensure the card or mobile device is placed within 1.5 in/4 cm of the contactless tap logo.

- Tips for inserting a card:
- Check if the POS application instructs to insert or tap the card.
- Ensure that there is no obstacle in the card slots.
- Check if the EMV chip is facing the correct direction when swiping or inserting the card.
- Ensure that your phone/tablet is a supported model.
- Insert the card at a steady speed.
- For contactless cards:
- Check that the card supports NFC payment.
- Ensure the card is placed within 1.5 in/4 cm range on top of the NFC marking.
- Take the card out of any enclosures, such as a wallet or purse, to avoid any interference.
Device can't be paired
- Please press & hold the power on/off button to restart your device.
- Please check to see if you can find the WisePad 3’s “Serial Number” (shown on the back of the device) in the “Scanned Device List” of your smartphone or tablet.
How often should I charge the reader?
Under typical usage, you should charge the reader once a day. A fully charged reader can run ~1000 transactions on a single charge.
How long does the pairing of Mobile POS devices with reader take?
It depends on several factors, one of which is if the reader software update is required or not. If an update is required, then the pairing will take comparatively longer as the reader will automatically update during the pairing process.
Why do I have to pair the reader with Mobile POS devices every morning?
Since the reader is paired to the App itself and not the device, every time you turn off the reader or log out from the App, you have to pair the reader.
Does Stripe have surcharge option?
Currently, Stripe doesn’t have an option to add surcharge.
How to view statements?
Login to your Stripe account and navigate to Payments > All payments > Export.
What if I already have an account with Stripe through a different vendor, but want to connect that account with this one?
You can connect the two accounts by using the same email address as you did while creating your previous account with Stripe. When your project coordinator sends you the Onboarding link, please enter the email address that is already registered with Stripe. This will link both the accounts.
What if I already have an account with Stripe through a different vendor, but want to keep both the accounts separate?
When the project coordinator sends you the Onboarding link, please use a different email address than the one that is already registered with Stripe.
Keeping the reader and POS software updated
Stripe periodically releases reader software updates to enable new features, improvements, and required security updates. Each reader must be manually updated using the Mobile POS App on each device.
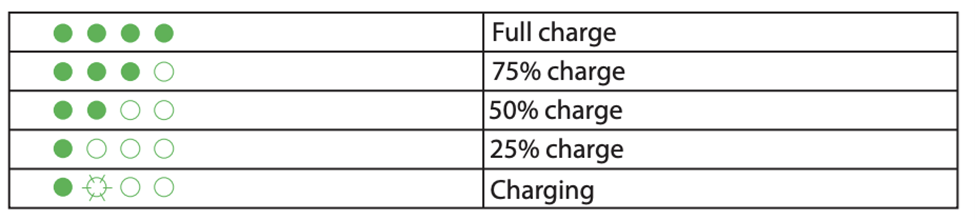
How do I view the reader’s charging status?
Press and release the power button once to see the charging status. The green LED lights on the reader indicate its battery status.
How do I turn off the reader?
The reader automatically turns off after 10 hours of inactivity. To turn off the reader manually, press and hold the power button until the four LEDs display a power down sequence (after roughly 6 seconds).
What do the different LED lights and reader sounds mean?